Last summer together with Karl-Henrik Nilsson and Nejc Palir I worked on a fun project that incorporated new features of Estimote Location Beacons. It was the solution for a public transport company that used beacons for two things – delivering proximity-based features and broadcasting custom messages to customers. The second part was possible thanks to GPIO ports on (then very) new Location Beacons. We worked closely with Estimote to deliver a solution based on not very well documented feature. It was built with Raspberry Pi running WiFi hotspot powered by an external battery, which runs Node.js serving configuration application. On top of that, we built client application for iPhone and several other components.
For this post, I’ll show a simpler example, to isolate one particular feature. I’ll focus on connecting Raspberry Pi to beacon, and writing code that will change broadcasted “Local Name” of it. I’ll also use Node.js as it allows for rapid changes without the need to recompile. This will be a good occasion to talk a little bit about UART, Bluetooth data frames and simple npm package we built as a result of this project. It’s open sourced on GitHub, so you can peek inside to see our lousy JavaScript and maybe offer some improvements? :)
You’ll need one Raspberry Pi with a clean install of Raspbian, one Location Beacon and 4-wire ribbon cable. Make sure your RPi can connect the Internet and install Node.js and npm.
Connecting Raspberry Pi to Estimote Location beacon
There is a bunch of features that differentiate Location Beacons from older Proximity Beacons. They have better battery life, a longer range, can broadcast multiple packets at the same time, more sensors, internal memory and few other things. They all greatly increase usage scenarios for beacons. More importantly, Location Beacons have GPIO port. You can use it for sending signals to connected devices, for example turning on lamps when you’re in proximity. But you can also use the port in UART configuration and use it to send data in both directions. For example changing BLE frame that is broadcasted by the beacon.
GPIO port has four pins. GND, Vcc IN (5V Power), GPIO0 and GPIO1
Picture comes from official Estimote App
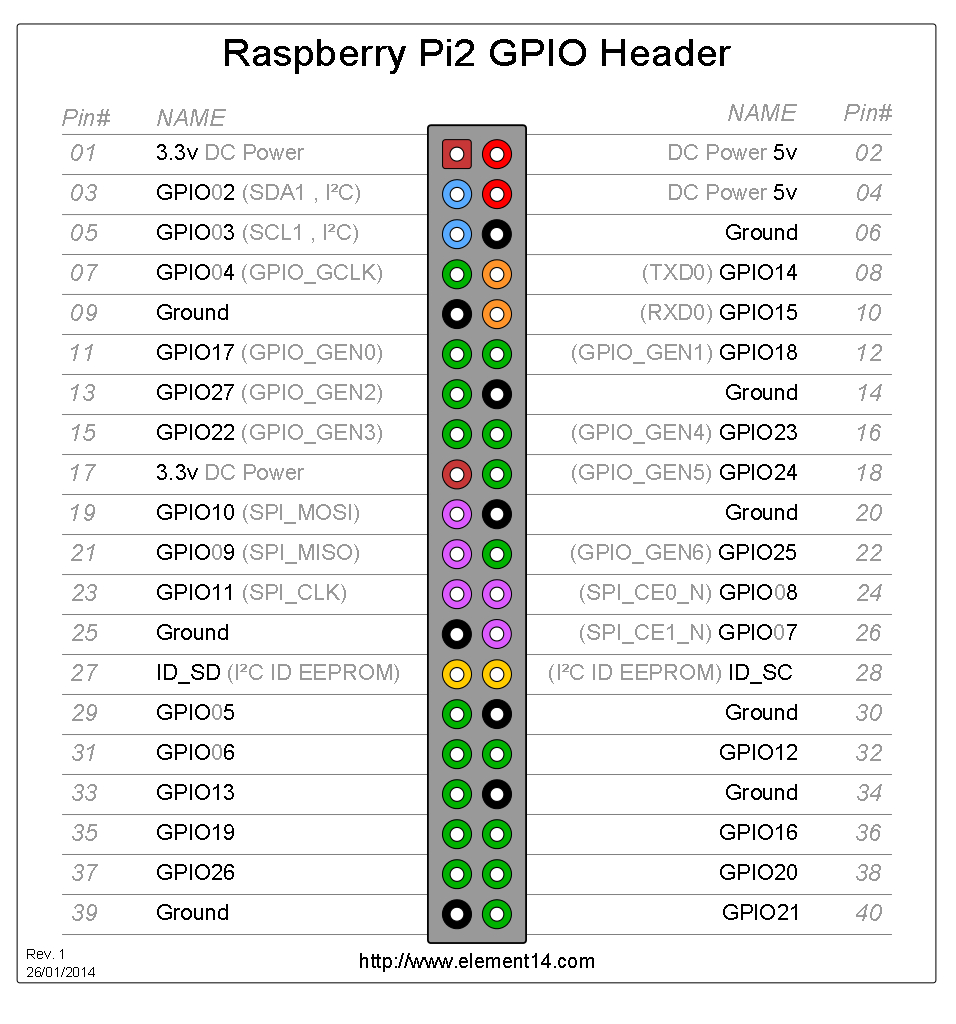
Picture comes from Element14
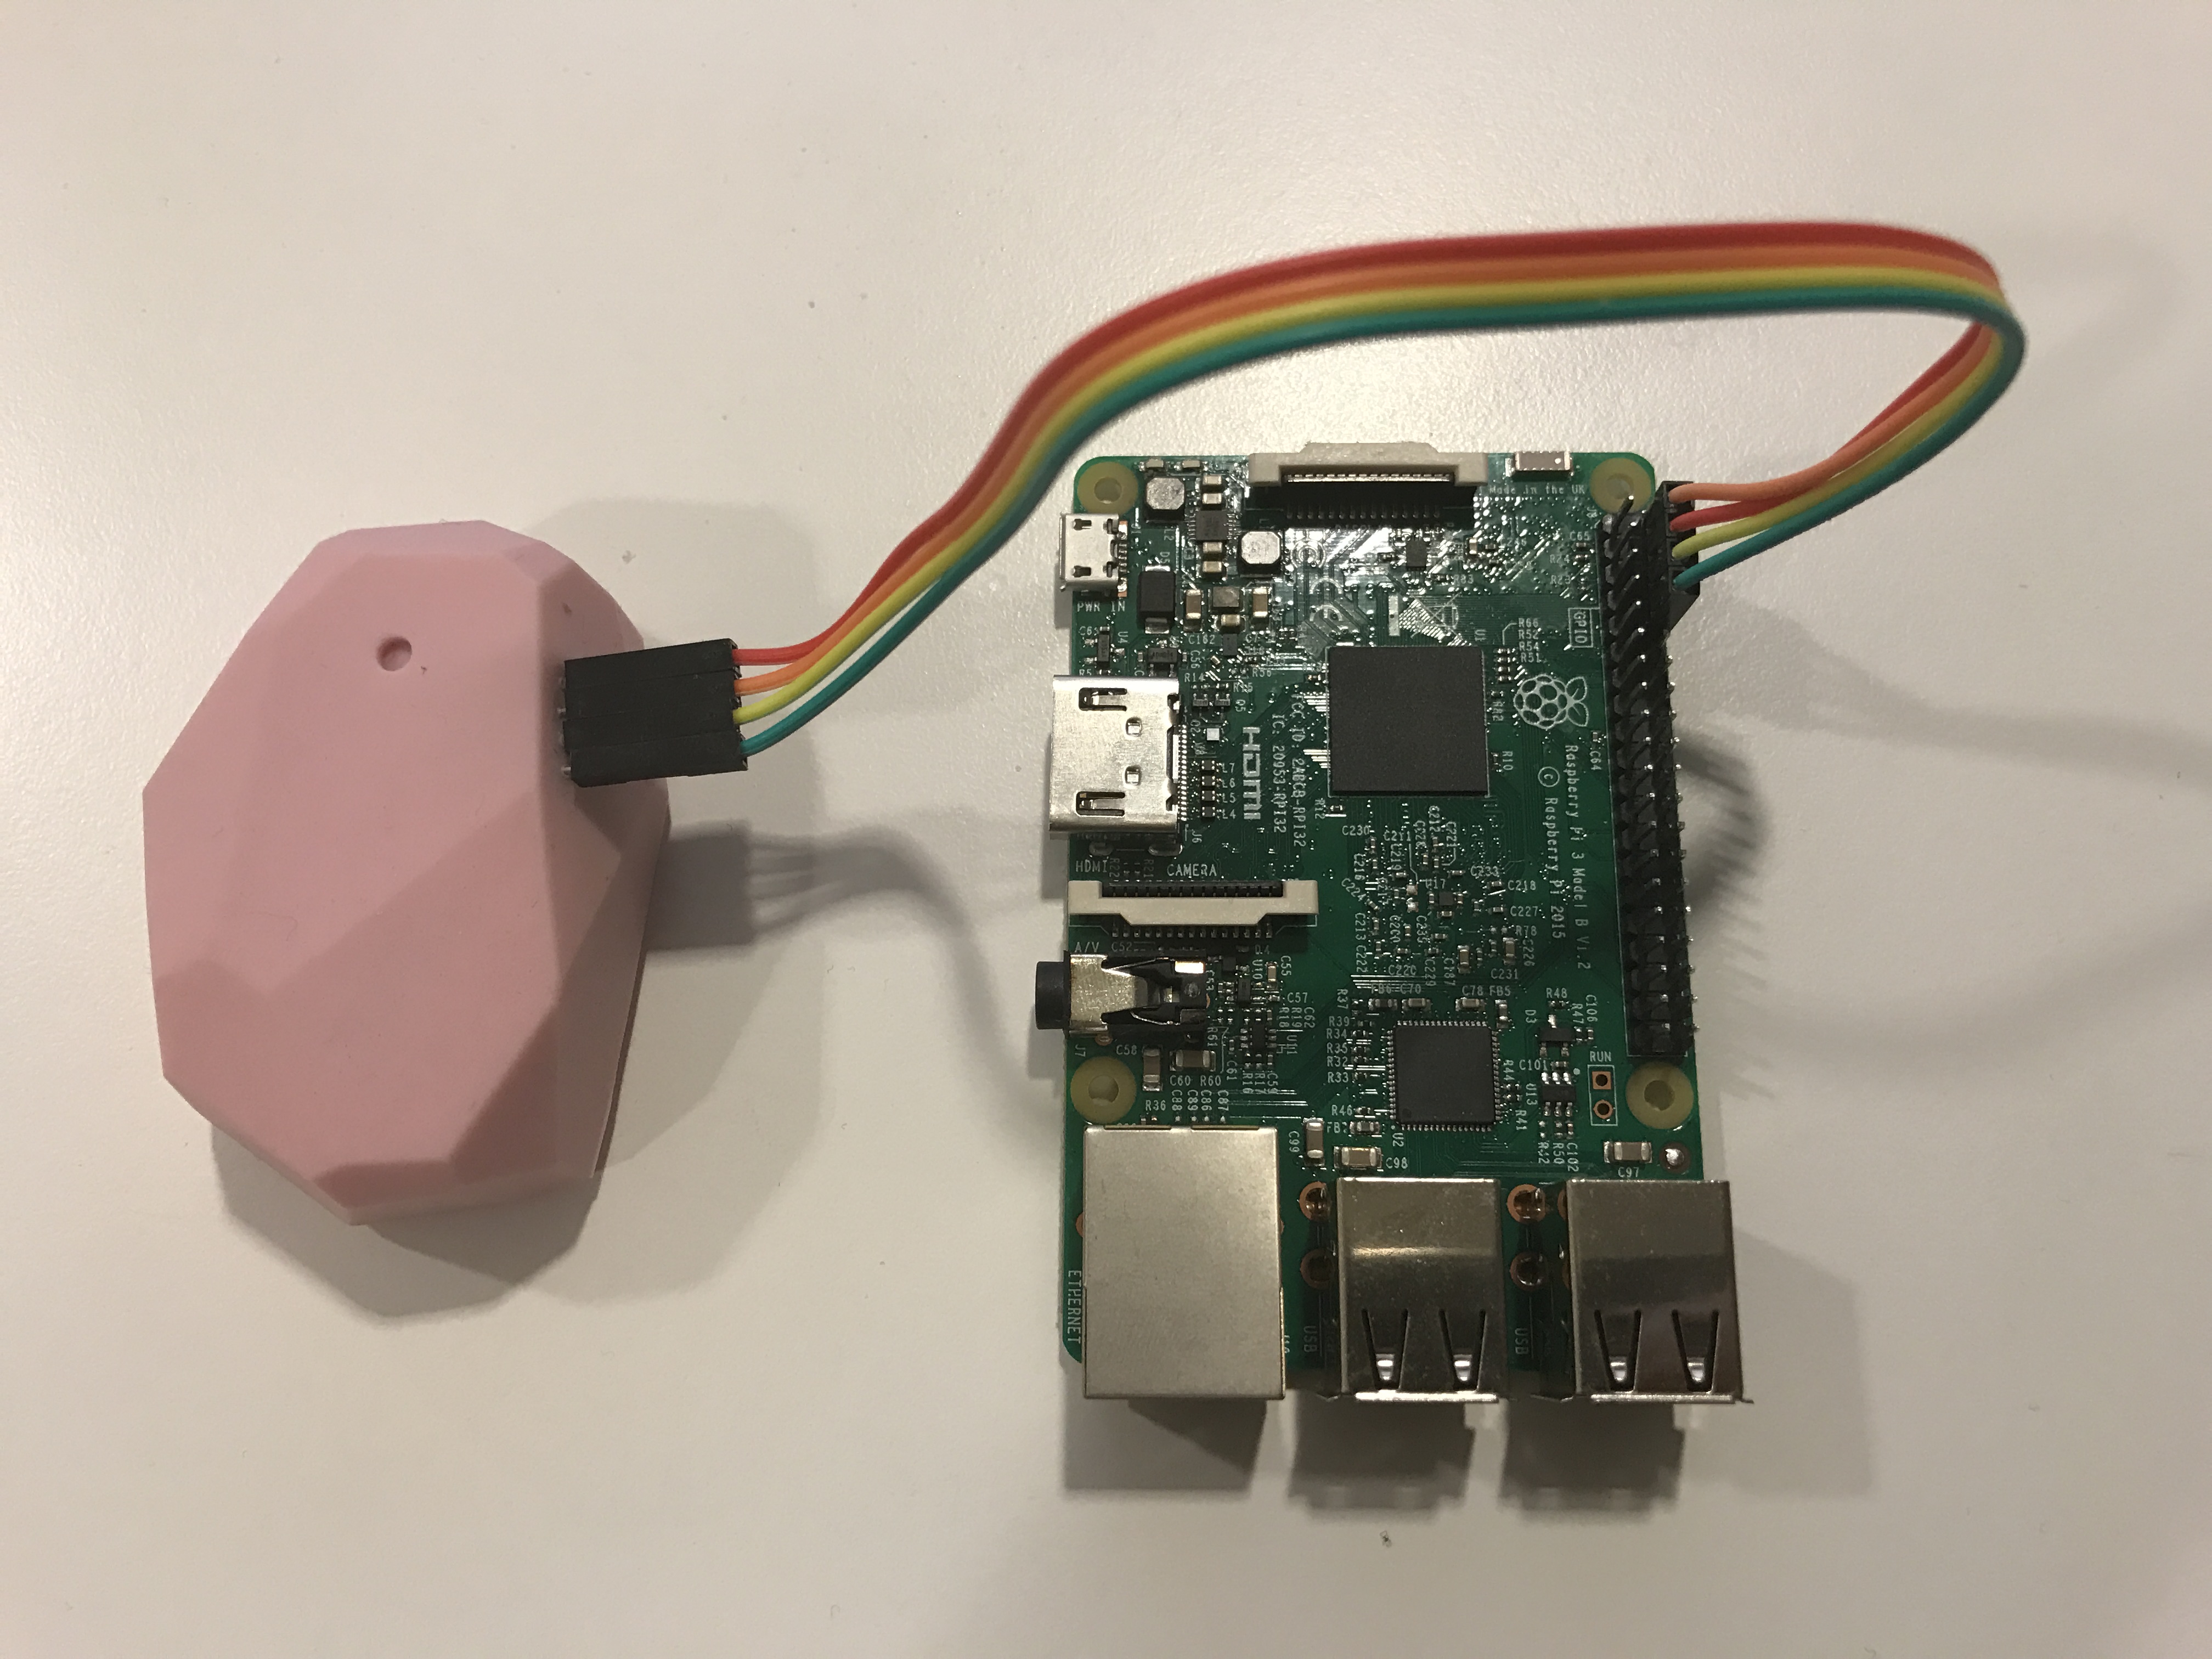
When you set the beacon to work in UART configuration (more on that in next paragraph), GPIO0 will be UART_RX (receiving) and GPIO1 will be ‘UART_TX’ (transmitting). To establish proper communication with Raspberry Pi, you’ll need to connect Vcc IN to Pi’s 5V power (pin 02), GND to GND (pin 06), GPIO0 (receiving) to GPIO14 (aka TXD0 – UART transmitting, pin 08) and GPIO1 to GPIO15 (aka RXD0 – UART receiving, pin 10). So power to power, ground to ground and transmitting to receiving (so one device can receive what other transmits).
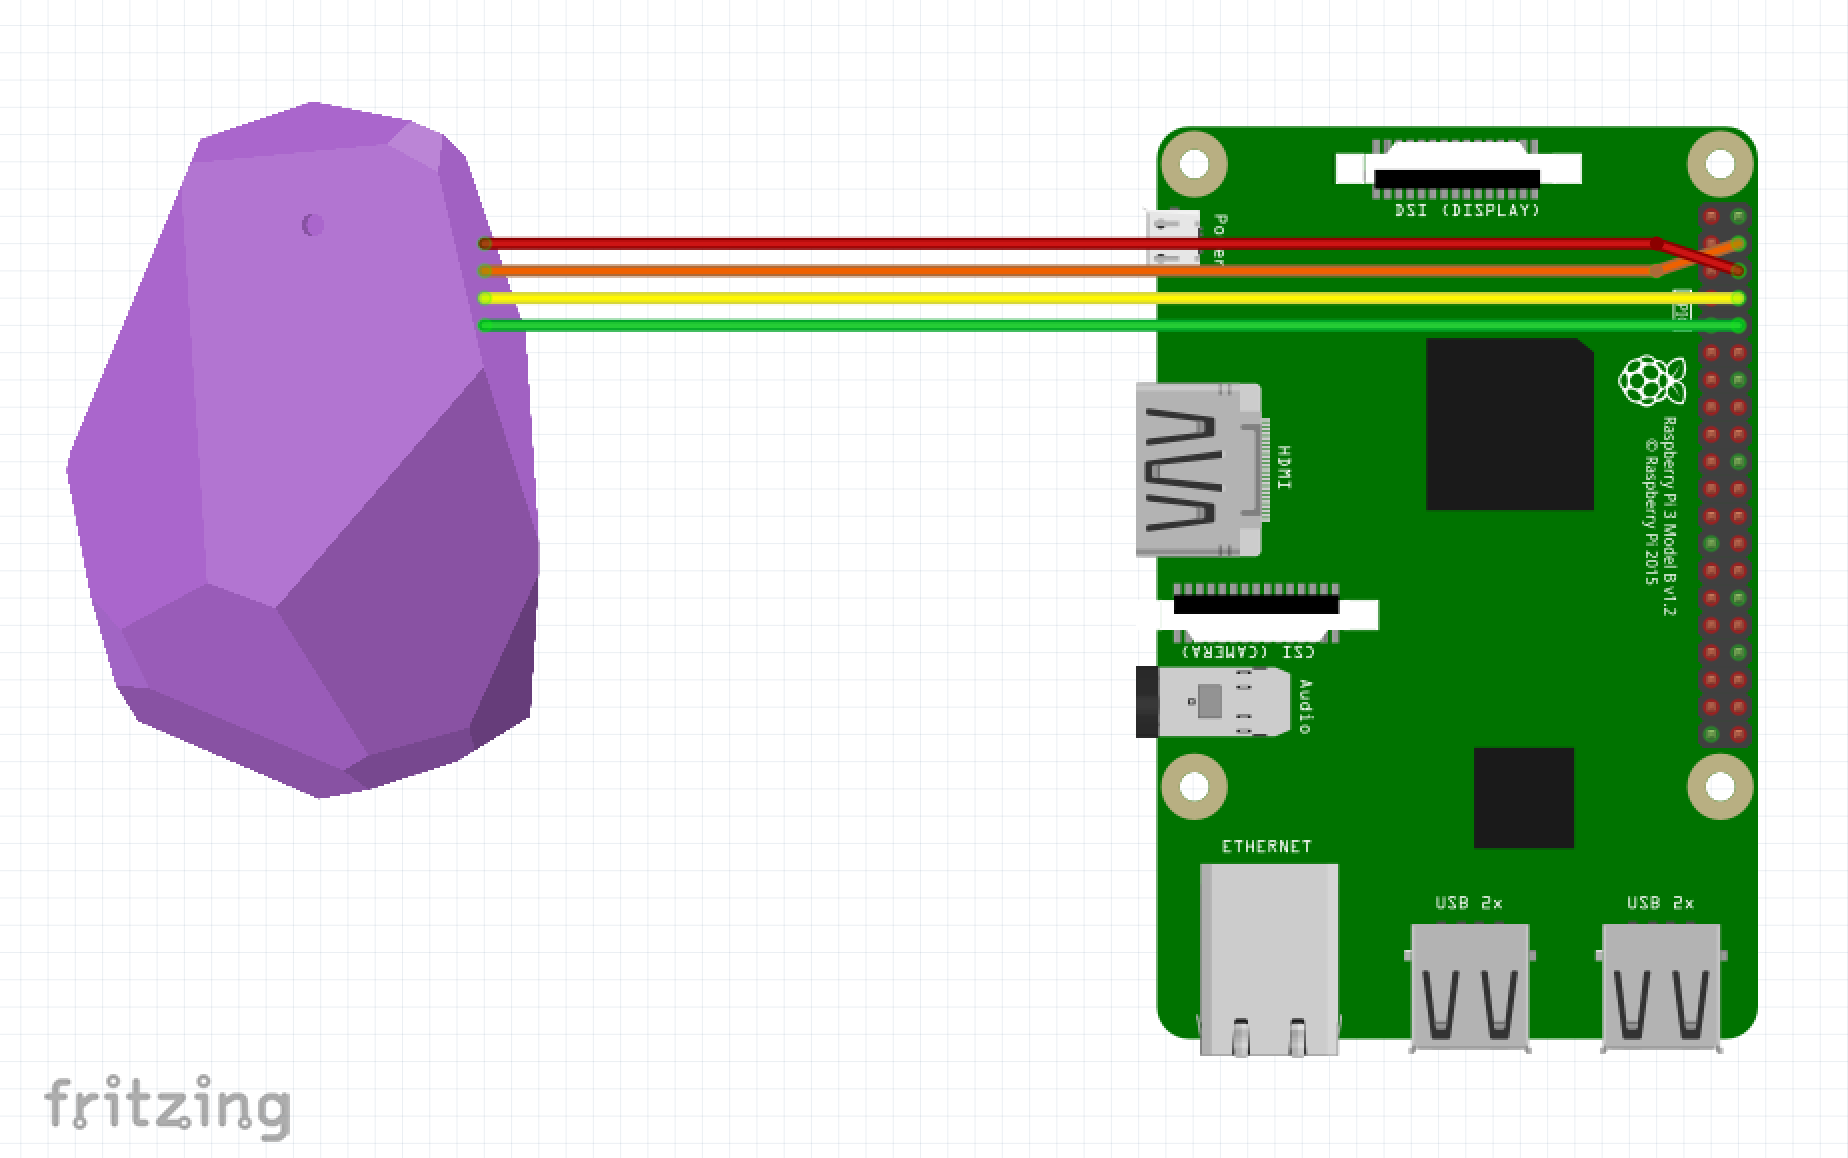
Picture: Simplified schematic made using Fritzing. The beacon image comes from a package made by Devin Mancuso that’s available on CreativeCommons Attribution 3.0 license. I modified his work to use in Fritzing.
Configuring beacon
Estimote Location Beacons by default are not configured to use GPIO in UART mode. There is no option to do so in the official app, but you can use the Estimote iOS SDK to do that. Alternatively, Piotr Krawiec built a modified version of Estimote’s “Configuration” iOS example/app template that does exactly that. You need to compile it by yourself and deploy on your iPhone. Then you’ll have to connect to the beacon and configure it. That should be all. Unfortunately, you won’t get any visual confirmation from the beacon that it worked.


Screenshots from UART configuration app
Estimote Android SDK doesn’t support enabling the UART mode yet so you might want to borrow an iPhone from a colleague. Alternatively, Estimote told us that if somebody asks for this to be added to the Android SDK, they will gladly do that.
Configuring Raspberry PI to use UART instead of console
We’ll also need some changes in RPi configuration. By default, the UART ports are set to work as external console connection point. So we need to do 2 small changes:
- In file /boot/config.txt add line
enable_uart=1 - in /boot/cmdline.txt change
serial0toserial1and make sure baud rate is set to115200
Writing to the beacon
UART (Universal Asynchronous Receiver/Transmitter) is a hardware used for asynchronous serial communication. It has very lightweight communication protocol and hence is quite often used in microcontrollers. Estimote beacons use UART with custom implemented protocol, called EstiUART. You can find simple documentation for it in this package from Estimote. The way it works is that whole Bluetooth frame that you want to broadcast gets wrapped in another frame of Estimote bytes and you just send it over at the certain baud rate.
Estimote has 3 custom broadcasters and you can broadcast 3 different messages in parallel. On top of that, you can use standard iBeacon or Eddystone broadcasting packages. EstiUart allows setting transmitting power, transmitting frequency and Bluetooth package for each of them separately. To set new broadcasting messages, first, you need to enable one of the broadcasters. Then you send whole BLE frame wrapped between Estimote header end stop byte.
There are 3 special bytes that you’ll have to take special care of:
- Estimote start byte. Every message is started with it: 0x73
- Estimote stop byte. Every message is finished with it: 0x65
- Escape byte: 0x5C
One example use is when you need to encode letter ‘e’ that has an ASCII code of 101 (0x65 in hex) so it won’t be confused with stop byte.
Example frame
Let’s look at the example below. It sets Local Name of the first of three advertisers to value “Test”:
0x73,0x13,0x42,0x10,0x00,0x00,0xBB,0xBB,
0xBB,0xBB,0xAE,0x02,0x01,0x04,0x06,0x09,
0x54,0x5C,0x65,0x5C,0x73,0x74,0x00,0x65
| Bytes | Description |
| 0x73 | Estimote start byte |
| 0x13 | Register that will be written to. 0x13 is a register to set advertised data for the 1st broadcaster. That means, that 1st broadcaster will now transmit BLE package starting from next byte. Some other examples: 0x11 is used to set advertising power (Tx) of the first broadcaster; 0x22 is used to set advertising interval for the second broadcaster. |
| 0x42 | 1st byte of PDU header, describing modes of communication. This is the beginning of Bluetooth frame. For Estimote this will always be 0x42. You can read more in this great blog post. |
| 0x10 | 2nd byte of PDU header – length of the packet. In this case 16. This includes following zero-byte, MAC address, following meta information and the message itself, but not padding. For the message, you shouldn’t count escape bytes, as they’re processed in estimote and won’t be transmitted as a part of Bluetooth packet. |
| 0x00 | Must be zero by design. |
| 0x00 0xBB 0xBB 0xBB 0xBB 0xAE |
MAC address. This is so-called static MAC address. It can be generated randomly but needs to meet few requirements. |
| 0x02 | Following is a number of GAP (Generic Acces Profile) sections consisting of three parts. 1) The length of the following section. In this case next 2 bytes. |
| 0x01 | 2) Type of section. 0x01 means “flags”. It’s the only mandatory section. Read more here. |
| 0x04 | 3) Section Content. For Estimote this flag must be set to 0x04. Read more about flags here. |
| 0x06 | Next GAP section length |
| 0x09 | Type of section. 0x09 is Complete Local Name. |
| 0x54 0x5C 0x65 0x5C 0x73 0x74 |
Section Content. This is the Local Name that will be broadcasted: “Test”
ASCII for T, Escape byte (because ASCII for ‘e’ is the Stop byte), ASCII for ‘e’, Escape byte (because ASCII for ‘s’ is the Start byte), ASCII for ‘s’, ASCII for ‘t’. |
| 0x00 | Padding. From my experience, just one byte is enough. |
| 0x65 | Estimote stop byte |
Beacon-pie package
To not deal with building the frame every time, me and Karl-Henrik build npm package that takes the message and do the work for us. It’s called beacon-pie. Currently, it only supports setting Local Name, but potentially you can set this way lot of other Bluetooth properties, like offered services. We also add controls to turn on/off broadcasters and change their parameters (interval and Tx).
Here is the simplest example how to set up Local Name to “Test” with BeaconPie. You can either set up all properties in one function or all of them separately.
How to confirm that it worked?
You don’t need to write your own app to just make sure it works. Eventually, you’ll want that because that’s why you make changes on the beacon in the first place. But to just check, there’s a simpler way. Download one of the beacon reading apps available on your platform application store. I use Nordic Semiconductors nRF Connect, which is available both for iOS and Android.
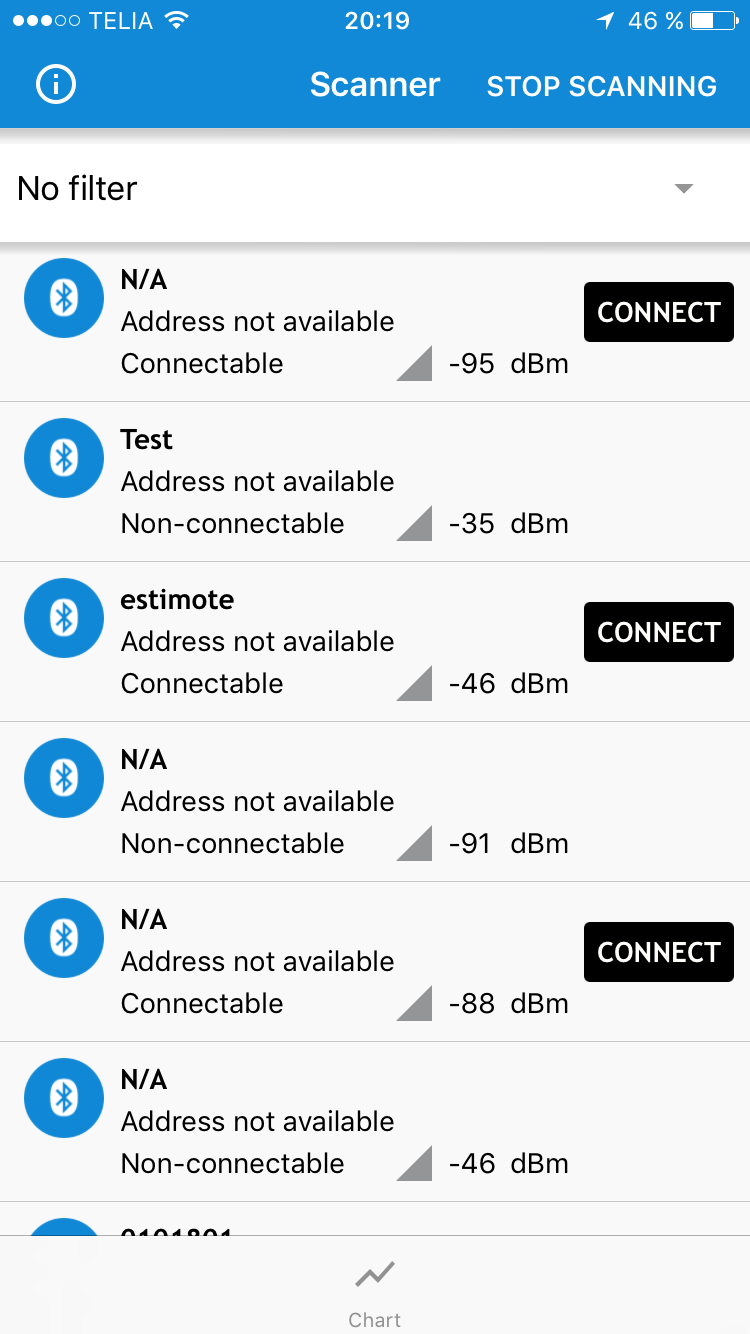 Screenshot from nRF Connect. You can see both our “device” that transmits local name ‘Test” and one of the default Estimote packets.
Summary
So to sum things up. It’s not well documented, but it’s totally possible to use GPIO of Location Beacons as UART input and alter broadcasting messages of the beacons. I used Raspberry Pi, but it will work with anything that can send bytes. And you can construct bytes manually, or use our npm package. Feel free to contribute, fork it or steal it.
Useful links
If you’re gonna write iPhone apps interacting with Bluetooth Low Energy Devices, I found those two blog posts very helpful:
Thanks for coming by. This was the most labour-heavy post on this blog so far. I also write about functional programming and machine learning. Look around, if you’re interested.
Simply want to say your article is as surprising.
The clearness in your put up is simply spectacular and that i can think you are an expert in this subject.
Fine along with your permission let me to snatch your RSS feed to keep up to date with coming near near post.
Thank you one million and please continue the rewarding work.
Thank you for your nice comment :) I’m definitely not an expert, but I spent a significant amount of time, both on this project, and writing this blog post. See you around!